Sep.
23, 2025
Contents
What is the Polishing Process and How Does It Work

The polishing process makes surfaces smooth and shiny. You use abrasives, pads, and sometimes a liquid slurry. These help remove tiny scratches and marks. This method gets rid of imperfections. It makes objects look clean and bright. People often polish things like:
Metals, such as stainless steel and aluminum, for a glossy look and better protection
Gemstones, including diamonds and rubies, to boost their sparkle
Glass, like mirrors, to create a clear, reflective surface
Plastics, such as acrylic, for a scratch-free shine
Many industries need polishing to meet high standards. For example:
Industry/Sector | Use of Polishing Process |
|---|---|
Automotive | Makes vehicles glossy and scratch-free |
Aerospace | Keeps important parts safe and smooth |
Electronics | Improves the look and strength of devices |
Metalworking | Prepares surfaces for coating and assembly |
Jewelry | Polishes metals and gems for a brilliant finish |
Polishing makes surfaces very smooth and shiny. This process is different from other finishing methods. It does not change the shape or size of things. Grinding changes how big or small materials are. Polishing is used for very fine details. You often see polishing on metals, plastics, and glass. It helps them look shiny and reflect light.
Tip: Polishing fixes tiny flaws you cannot see. It makes surfaces look perfect in ways other methods cannot.
Polishing uses abrasives, pads, and sometimes a liquid slurry. These tools help remove scratches and marks. Abrasive particles rub gently on the surface. This smooths out rough spots. The slurry can have chemicals that react with the surface. This helps abrasives work better. You need abrasive particles that are all the same size. If they are too big or uneven, you may get scratches or defects.
Mechanism | Description |
|---|---|
Chemical and Mechanical Actions | Chemicals in the slurry change the surface, and abrasives remove the layer. |
Particle Size Matters | Even-sized particles prevent scratches and give a smoother finish. |
Slurry Stability | Well-mixed slurries avoid clumps that can damage the surface. |
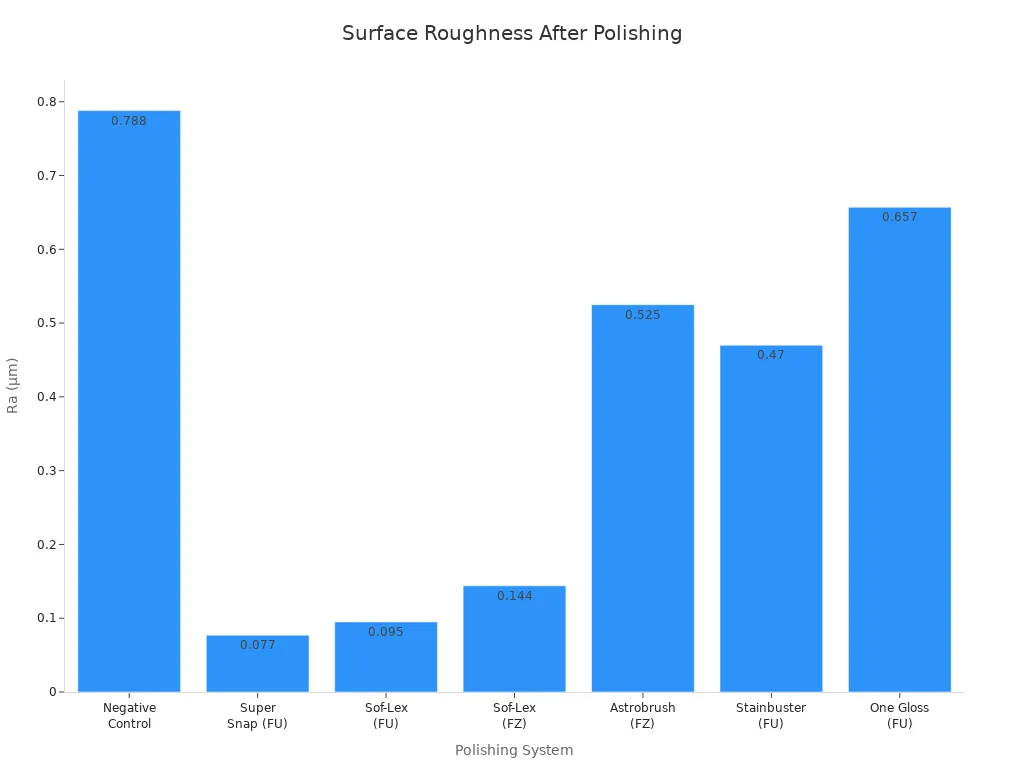
You can see how different polishing systems make surfaces smoother in the chart below:
Polishing gives you more than just a shiny look. It makes things look better and last longer. Polishing helps stop rust by making a smooth layer. This keeps out water and chemicals. This is important for metals like stainless steel. Smooth surfaces are harder for dirt or germs to stick to. This helps in food and medical places. Moving parts work better because polished surfaces have less friction.
You get a shiny, nice-looking finish.
You protect materials from rust and corrosion.
You lower the chance of contamination.
You help parts move and work better.
Benefit | Description |
|---|---|
Improves Aesthetics | Gives a smooth, glossy look to materials. |
Increases Corrosion Resistance | Makes metals like stainless steel less likely to rust or corrode. |
Reduces Contamination Risks | Helps keep surfaces clean in food and medical settings. |
Enhances Surface Functionality | Reduces friction, so moving parts work better and last longer. |
Facilitates Inspection | Makes it easier to check materials under a microscope. |
You always begin the Polishing Process by getting the surface ready. This step makes sure the surface is clean for polishing. You take off dirt, grease, and old coatings. Brushes, solvents, or mild abrasives can help with cleaning. Clean surfaces let new materials stick better and last longer. If you skip this part, the finish might not look good or stay strong.
You get rid of all dirt and grease.
You check for hidden oils that could change the final look.
You pick the best tools to make the surface smooth.
Note: Careful surface prep helps coatings and adhesives stick well. You get a finish that lasts longer and stays strong.
After cleaning, you put abrasives on the surface. There are many kinds of abrasives. You pick the right one for the material you want to polish. Hard abrasives work best for strong metals. Softer abrasives are better for things like jewelry or wood. You use pads, wheels, or blasting machines to spread the abrasive.
Abrasive Type | Description | Typical Applications |
|---|---|---|
Steel Shot & Grit | Tough and recyclable, good for cleaning and texturing. | Used on many surfaces, peening jobs. |
Starblast | Coarse and fine sands, low silica, great for blasting. | Removes scale and rust from steel. |
Walnut Shells | Hard natural material, good for softer surfaces. | Polishes soft metals, fiberglass, wood, and stone. |
Corn Cobs | Softer abrasive, best for cleaning and shining. | Used for jewelry, cutlery, engine parts, and graffiti removal. |
You press evenly and move slowly. This helps you avoid scratches and rough spots. The right abrasive makes the Polishing Process work better.
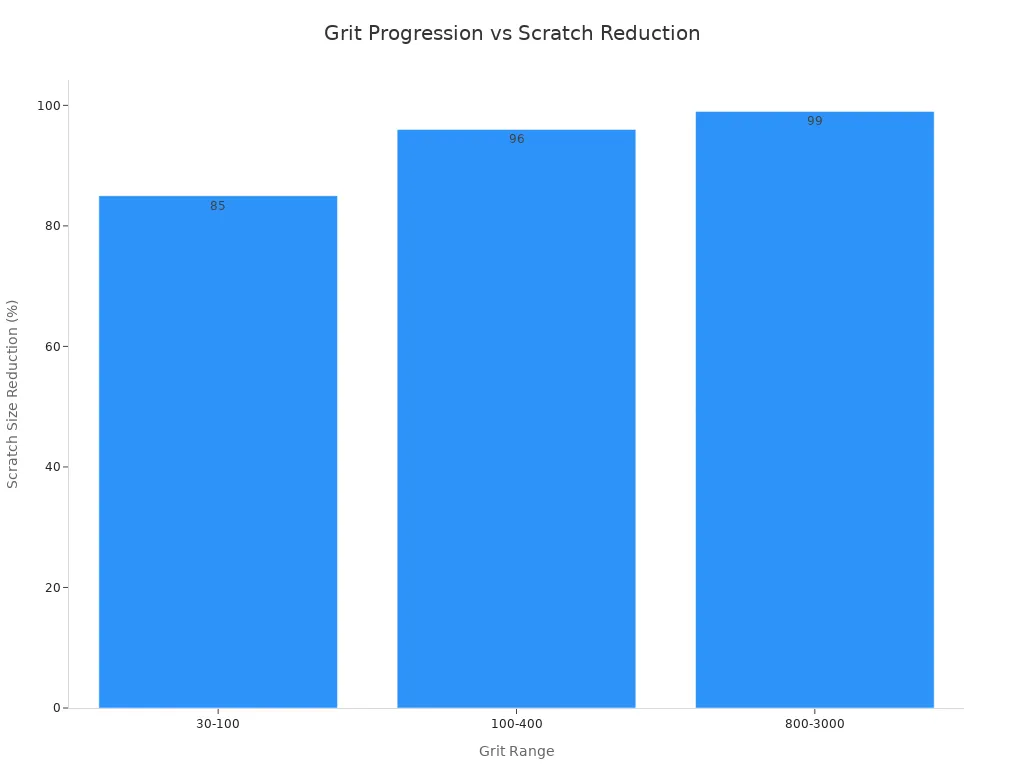
Fine polishing happens after rough abrasives. You switch to finer abrasives and sometimes use a water-based slurry. This step takes away tiny scratches and makes the surface shiny. You use different grit levels, starting with rough and ending with very fine. Each grit makes the surface smoother.
Grit Range | Primary Purpose | Scratch Size Reduction |
|---|---|---|
30-100 | Removes lots of material | 80-90% |
100-400 | Makes the surface smoother | 95-97% |
800-3000 | Improves clarity | 99%+ |
You use pads or cloths with fine abrasives. You may add slurry to help the particles move easily. This step gives a mirror-like shine and gets the surface ready for checking.
Tip: Always use the right grit order. If you skip grits, scratches may show up later.
Buffing is the last step in the Polishing Process. You use soft pads or wheels to make the surface shine the most. Buffing takes away any last marks and makes the surface look perfect. You check the surface to see how well you did. You use tools like digital microscopes to find tiny scratches. Special lights help you see defects on ceramics or metals. Surface roughness meters show how smooth the finish is.
Digital microscopes help you see small flaws at 80x zoom.
Coaxial lights help you spot defects at higher zoom.
Surface roughness meters tell you how smooth the surface is.
New systems use smart networks to find even tiny defects. These systems help you make sure your polished surface meets high standards.
Callout: Careful checking helps you find problems early. You get a better result and avoid expensive mistakes.
Manual polishing means you use your hands and simple tools. You might use sandpaper, cloths, or small pads. This way, you have a lot of control. You can work on tiny spots or odd shapes. Manual polishing is good for small jobs, jewelry, or fixing things.
Tip: With manual polishing, you can feel the surface as you go. You can stop and check your work whenever you want.
Manual polishing takes more time and effort. You need to be patient and careful. It works best for easy shapes or when you want a special touch.
Polishing Method | Advantages | Disadvantages |
|---|---|---|
Manual Polishing | - Full control | - Slow |
Mechanical polishing uses machines to do the hard work. You might use wheels, sanders, or grinders. These tools use things like sandpaper or paste. Mechanical polishing is fast and makes things shiny.
You often see this in factories or workshops. It is great for flat things and simple parts. Machines help you polish many items quickly.
Equipment Type | Description |
|---|---|
Abrasive Materials | Sandpaper, paste, wheels for smooth finishes |
Applications | Used in mold, jewelry, and metal making |
Mechanical polishing can make surfaces very shiny. It also helps keep things clean and less sticky. But it can leave tiny scratches and needs skilled workers. Machines can be loud and make dust, so you must wear safety gear.
Feature | Mechanical Polishing |
|---|---|
Surface Finish | High gloss, may have micro-scratches |
Precision | Precise control |
Processing Speed | Slower, needs several steps |
Labor Requirement | High, needs skilled workers |
Best for | Flat, simple parts, custom finishes |
Chemical polishing uses special liquids or chemicals to smooth things. You dip the item in a solution, and the chemicals take away rough spots. This works well for tricky shapes or lots of small parts. You do not need to rub or grind.
Chemical Agent | Material Type | Effect on Material |
|---|---|---|
Chemical Polishing | Aluminum, Copper, Stainless Steel | Smooths by dissolving raised areas |
Electropolishing | Stainless Steel, Copper, Aluminum | Uses electricity for a glossy finish |
Acid Polishing | Aluminum, Copper, Stainless Steel | Strong acids polish the surface |
Chemical polishing gives a mirror-like shine with no scratches. It works fast and can handle many items at once. You must be careful with chemicals and follow safety rules. Chemical polishing can make waste that needs special care.
Note: Chemical polishing is best for tricky shapes and when you want a very smooth, shiny finish.
Polishing methods can affect the environment. Machines use energy and make dust. Chemical ways can make waste and bad gases. You help the planet by picking the right way and using safe steps. Always think about the whole process to make your work better for the earth.
You use many materials for polishing. Each material gives a different result. Metals like stainless steel, aluminum, and brass look shiny after polishing. Some metals, like cast iron and zinc, are harder to polish. They can clog your abrasives or need special care. The table below shows how metals act when you polish them:
Metal | Characteristics | Why It Polishes Well |
|---|---|---|
Stainless Steel | Hard, corrosion-resistant | Mirror-like shine, good for decoration and function |
Aluminum | Soft, lightweight | Bright finish, needs sealing to prevent oxidation |
Brass | Alloy of copper and zinc | Quick polish, warm gold-like finish |
Copper | Soft, ductile | Rich luster, tarnishes quickly |
Chrome | Very hard, plated | Excellent mirror finish, needs light polishing |
Cast Iron | Porous, uneven surface | Best with matte finish |
Zinc | Soft and gummy | Can clog abrasives, needs careful compound selection |
Anodized/Coated Metals | Protected by finish layer | May need stripping, risk of damage |
Titanium | Hard, oxidation-prone | Needs special abrasives and techniques |
You also use abrasives, pads, and slurries for polishing. New polishing fluids help you get smoother surfaces faster. These are good for high-tech jobs like silicon wafers.
You need the right tool for each polishing job. Abrasive wheels take away deep scratches. Soft buffing wheels make things shiny. Matte abrasive wheels give a satin look. Cylinder polishers help with small details and hard-to-reach spots. The table below explains what each tool does:
Tool Type | Application | Result |
|---|---|---|
Abrasive wheels | Remove deep scratches | Prepares surface |
Soft buffing wheels | Final shine | High gloss finish |
Matte abrasive wheels | Create matte or satin finish | Non-reflective surface |
Cylinder polishers | Polish details and intricate designs | Detailed polishing |
Tip: Clean your tools often and check them. Change pads and wheels when they get worn out. This keeps your work looking good.
You must stay safe when polishing. Dust, noise, and fast tools can hurt you. Always wear safety glasses, gloves, and a respirator. Use earplugs if machines are loud. The table below shows dangers and how to stay safe:
Hazard Type | Description | Risk Reduction Strategies |
|---|---|---|
Airborne Particulates | Dust and toxic particles | Use vacuum systems, wear respirators |
Hand-Arm Vibration | Tool vibration can hurt your hands | Use ergonomic tools, take breaks |
Physical Injury | Cuts and burns from fast tools | Inspect tools, use guards, follow rules |
Noise | Loud machines can damage hearing | Wear earplugs or earmuffs |
Hazard | Required PPE | OSHA Standard |
|---|---|---|
Flying debris | Safety glasses or face shield | 1926.102 |
Silica dust | NIOSH-approved respirator | 1926.1153, 1910.134 |
Excessive noise | Earplugs or earmuffs | 1910.95 |
Impact to head | Hard hats | 1910.135 |
Crush injury | Steel-toe safety boots | 1926.96 |
Cuts to hands | Heavy-duty gloves | 1910.132 |
Alert: Always follow safety rules and wear the right gear. This keeps you safe and helps stop accidents.
You can get a perfect polish by following some smart tips. Experts say these best practices help:
Select the right tools for your job and material. The wrong pad or abrasive can hurt the surface.
Adjust speed and pressure while polishing. Too much pressure or speed can make scratches or heat marks.
Ensure cleanliness at every step. Dirt or leftover abrasive can scratch your surface.
Inspect the material’s temperature as you work. If it gets too hot, it can change color or bend.
Tip: Clean your workspace and tools before you start. This easy step helps stop scratches and keeps your results the same.
Many people make mistakes when polishing that mess up the finish. If you use the wrong way or skip steps, the surface can stay rough. The table below shows how different polishing systems change surface roughness:
Polishing System | Surface Roughness (Ra) |
|---|---|
System A | Value 1 |
System B | Value 2 |
System C | Value 3 |
Bad polishing can make the surface rougher. You might see dull spots or scratches if you rush or use the wrong abrasive. Always use the right grit order and check your work as you go.
Alert: If you skip steps or use dirty tools, you can ruin your work. Go slow and pay attention to each part.
You need to choose the best polishing method for your project. Think about these important things:
Material Type: Metals, ceramics, and composites need special ways.
Desired Surface Finish: Pick if you want a mirror shine or a matte look.
Equipment Availability: Use the tools and machines you have.
Think about your goals and the material you are working with. The right method helps you get the best results and saves time.
Note: Matching your method to your material and finish goal makes the polishing process easier and works better.
If you follow each step in the polishing process, you can get a perfect finish. Each part takes away marks from before and keeps your material strong. Using good tools and materials, like diamond polish and fine alumina, helps stop scratches and problems.
Careful roughing gets the surface ready for smooth polishing.
Checking your work at every step keeps your results great.
Be patient, wear safety gear, and trust the steps. With practice, you will make surfaces that are shiny and last a long time. ✨
You can polish metals, plastics, glass, and gemstones. Each material needs a different abrasive or tool. Metals like stainless steel and aluminum shine well. Plastics and glass need softer pads. Gemstones use special compounds for extra sparkle.
You pick the abrasive based on the material and the finish you want. Hard metals need tough abrasives. Softer materials use gentle ones. Start with coarse grit for rough surfaces. Switch to fine grit for a smooth, shiny finish.
Tip: Always test on a small area first.
You can polish safely if you follow basic rules. Wear safety glasses and gloves. Use tools at low speed. Clean your workspace before you start. Read instructions for each product. Ask for help if you feel unsure.
The time depends on the material and the finish you want. Small items may take minutes. Large surfaces or deep scratches need more time. You get better results if you work slowly and check your progress often.
You can fix most mistakes. If you see scratches or dull spots, go back to a finer abrasive. Clean the surface and try again. Use gentle pressure. Inspect your work after each step to catch problems early.
Latest News


Products

45# Steel

45# Steel

45# Steel

Aluminum Tube

Aluminum Alloy

45# Steel

Aluminum Alloy

304 Stainless Steel
Navigation
Navigation
Contact Us
Tel: +86 13417419143
E-mail: [email protected]
Add:
2nd Floor, Building 7, 156 High Tech Industrial Park, Fuyuan 1st Road, Zhancheng Community, Fuhai Street, Baoan District, Shenzhen City, China.